Hướng Dẫn A-Z, Kiến Thức Wordpress
How to Add an Image in WordPress Sidebar Widget
Do you want to add an image to a sidebar widget in WordPress?
By default, WordPress makes it easy to upload and add images anywhere on your website. You can add them to sidebar widgets just as easily as you can to pages or blog posts.
In this article, we will show you how to easily add an image to your WordPress sidebar widget.
We will share multiple methods so you can use one that works best for your WordPress site.
Simply click the links below to jump ahead to your preferred section:
- Adding an Image in WordPress Using Image Widget Block
- Adding an Image in WordPress Classic Widget Area
- Manually Adding an Image in WordPress Sidebar Widget
- Adding an Image in WordPress Sidebar Using a Plugin
Adding an Image in WordPress Using Image Widget Block
You can use an image widget block to add images to your site’s sidebar.
The widgets block editor was introduced in WordPress 5.8, and it replicates the experience of using the WordPress content editor. You can use different blocks to add forms, related posts, pictures, and other elements to the widgets area using blocks.
To start, you will need to visit the Appearance » Widgets page from your WordPress dashboard. After that, simply click the ‘+’ button and add an image widgets block.

Next, you can add an image in the widget block using 3 ways.
For instance, you upload an image, choose an existing image from your WordPress media library, or insert the image from a URL.

In the widget block editor, you’ll also get options to change the style, add an alt-text, and edit the image size.
There are settings to change the image border and other advanced settings.
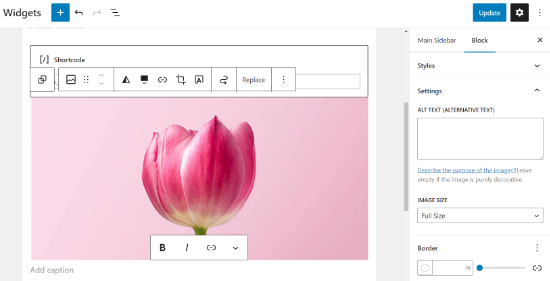
When you’re done, don’t forget to click the ‘Update’ button.
Next, you can visit your website and see the image in the sidebar.

Adding an Image in WordPress Classic Widget Area
If you are using an older version of WordPress or you’ve disabled widgets blocks, then you can also easily add an image to the sidebar.
Simply go to the Appearance » Widgets page from your WordPress admin panel and add the ‘Image’ widget to your sidebar. If you haven’t used widgets before, then see our guide on how to add and use widgets in WordPress.

The widget will expand, and you will be able to see its settings.
The first option is to add a title to the image widget. After that, click on the ‘Add Image’ button to continue.
This will bring up the WordPress media uploader, where you can click on the upload files button to upload your image or select an image you have previously uploaded.
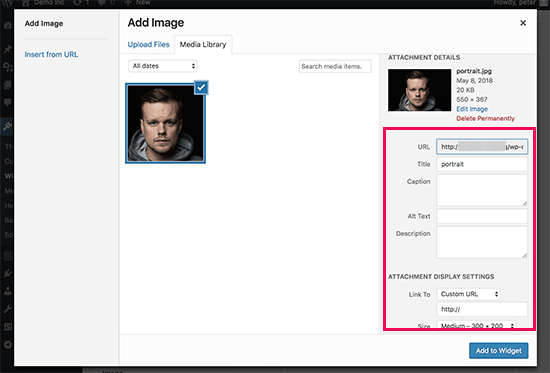
After uploading the image, you will see the image settings in the right column. From here, you can provide a title or alt text for the image, add a description, select size, or even add a link.
Once you are done, you can click on the ‘Add to Widget’ button to save your changes. You will now see a preview of the image inside the widget settings area.
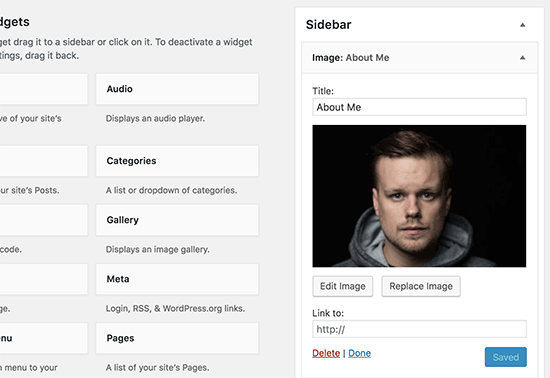
Don’t forget to click on the ‘Save’ button to save your image widget.
You can now visit your website to see the image displayed on your WordPress blog’s sidebar.

Manually Adding an Image in WordPress Sidebar Widget
In some cases, you may need to add additional HTML code to your image. The default text widget allows some very basic HTML, but it may not work with advanced HTML or formatting. In that case, you will need to manually add an image to your blog’s sidebar.
First, you need to upload the image to your WordPress site. Simply go to Media » Add New and upload your image file.
After uploading the image, you need to click on the Edit link next to the image.
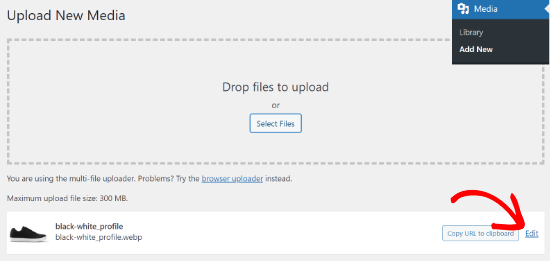
WordPress will now take you to the ‘Edit Media’ page, where you will see the image file URL on the right side of the screen.
You need to copy this URL and paste it into a text editor like Notepad.

Next, you need to go to the Appearance » Widgets screen from your WordPress dashboard.
After that, you can add the ‘Custom HTML’ widget block to your sidebar where you want to display the image.
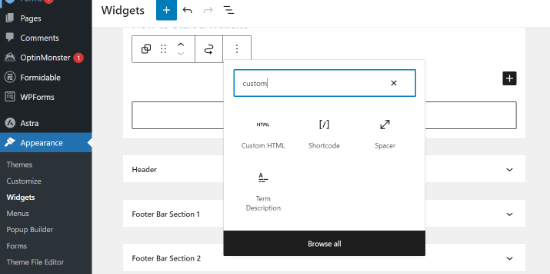
In the text box area of the widget, you need to add your image using this code:
<img src="Paste The File URL Here" alt="Strawberries" />
The img tag is used in HTML to display images. It needs two attributes. The first one is src , which defines the image file location. This is where you will paste the URL you copied earlier.
The second one is alt which is used to provide an alternate text for the image. Your final image tag will look something like this:
<img src="http://www.example.com/wp-content/uploads/2014/09/strawberries.jpg" alt="Strawberries" />
You need to click on the ‘Update’ button to store your widget settings and then preview your website.
Adding an Image in WordPress Sidebar Using a Plugin
Are you wondering how to add a photo widget using a WordPress plugin?
Another way to add images to your WordPress sidebar is by using a plugin. This will give you a few more options and a simple interface, which some beginners may find easier than the default ‘Image’ widget.
First, you need to install and activate the Image Widget plugin. For more details, see our step-by-step guide on how to install a WordPress plugin.
Upon activation, simply go to the Appearance » Widgets page and add the ‘Image Widget’ block.
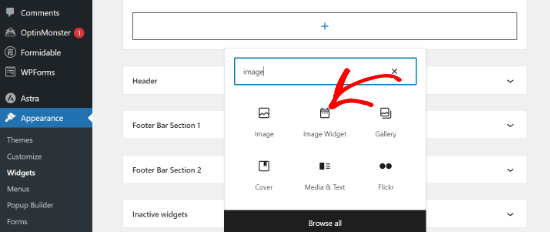
Next, click on the ‘Select Image’ button to upload an image or select one from the media library.
After that, you need to click on the ‘Insert to Widget’ button, and you will see the image preview under the widget settings.
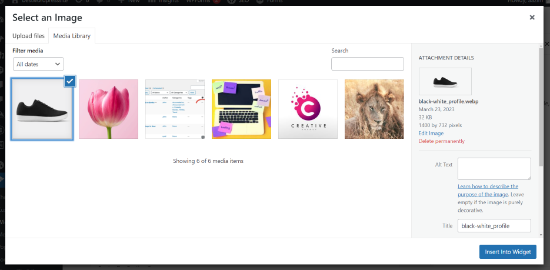
You can add a title or alt text, as well as a link and caption for the image.
You can also choose an image size from the list of available options, edit the alignment, and more.
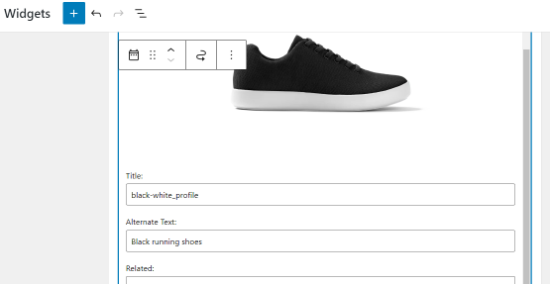
Once you are satisfied, simply click on the Update button to save the image widget. That’s all. You can now go to your website and see the image displayed in your sidebar.
We hope this article helped you add an image to the WordPress sidebar widget. If you come across a problem, don’t forget to look at our guide on how to fix common image issues in WordPress and how to change the sidebar side in WordPress.
If you liked this article, then please subscribe to our YouTube Channel for WordPress video tutorials. You can also find us on Twitter and Facebook.

