Hướng Dẫn A-Z, Kiến Thức Wordpress
How to Easily Change the Font Size in WordPress
How to Easily Change the Font Size in WordPress
Do you want to change the font size on your WordPress posts or pages?
Sometimes, you may want to make a line or a paragraph larger, or you might want to increase the font size on the entire page.
In this article, we will show you how to easily change the font size in WordPress posts and themes.

Why Change Font Size in WordPress?
By changing the font size on your WordPress website, you can improve the content’s readability and make it easier for users to go through it.
Plus, increasing the font size can help you highlight important information on your WordPress blog.
For example, if you are showcasing an affiliate product on your site, then increasing its font size can help make the product more noticeable. It can also make content more readable for viewers who are accessing your website through mobile devices.
Having said that, let’s see how to easily change font size in WordPress.
For this tutorial, we will be discussing multiple methods, so you can use the links below to jump to the method of your choice:
- Video Tutorial
- Method 1: How to Change the Font Size Using Headings
- Method 2: Change the Font Size of Text in the Block Editor
- Method 3: Change Font Size Using a Plugin
- Method 4: Change Site-Wide Font Size Using WPCode
- Bonus: Change Text Color in WordPress
Video Tutorial
If you’d prefer written instructions, keep reading.
Method 1: How to Change the Font Size Using Headings
If you are looking for an easy way to change the font size using headings, then this method is for you.
Using headings in your content is a great way to grab user attention with a larger-size font.
In most WordPress themes, headings are in a larger font than the regular body text, allowing you to break your posts and pages into sections.
Headings are also great for improving website SEO, as search engines give proper headings more weight than normal paragraph text.
How to Add a Heading in the Default WordPress Block Editor
First, you need to open up a new post or page in the WordPress block editor.
Once you are there, click the ‘Add Block’ (+) button at the top left corner of the screen to open up the block menu.
From here, you must find and add the Heading block to the page/post.
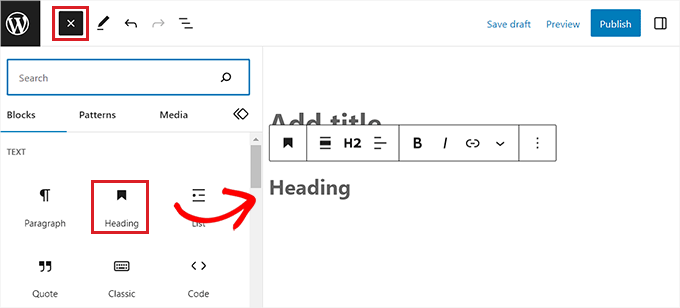

By default, the block will be set to Heading 2.
If you are adding a sub-heading, then it makes sense to stick with the ‘Heading 2’ option.
However, if you want to change this, then you can simply click on the ‘H2’ drop-down menu to select a different size.


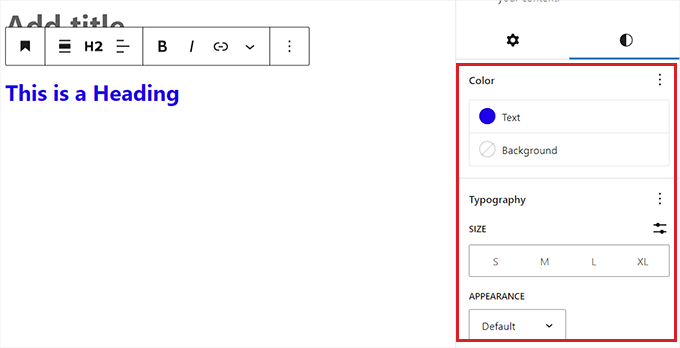
Alternatively, you can also change the heading size using the block settings on the right toolbar of the screen.
You can even customize the heading’s color, appearance, letter case, and more.
Once you are done, don’t forget to click the ‘Update’ or ‘Publish’ button to store your settings.

How to Add a Heading in the Old Classic Editor
If you are still using the old classic editor in WordPress, then you can add headings using the Paragraph dropdown menu.
First, select the text that you want to turn into a heading using your mouse.
Next, click the ‘Paragraph’ dropdown menu in the top left corner and select your heading size. You have now successfully changed the font size to a heading.
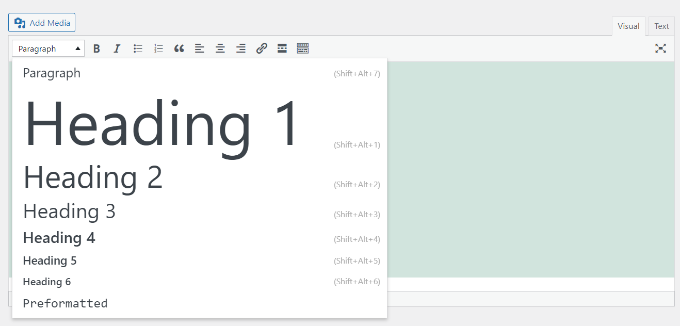

However, keep in mind that the classic editor does not allow you to change the sizes and font colors of the different Heading styles.
If you want to do that, then you’ll need to make changes to your theme’s stylesheet (style.css).
Finally, just click the ‘Update’ or ‘Publish’ button to save your changes.
Method 2: Change the Font Size of Text in the Block Editor
If you want to change the default font size of the text in your Paragraph block, then this method is for you.
First, you need to open up an existing page/post in the Gutenberg editor.
Once you are there, click on any Paragraph block and then switch to the ‘Styles’ tab from the block panel on the right side of the screen.
From here, you must choose a font size from the ‘Typography’ section.


You can select the Small, Medium, Large, or Extra Large option according to your needs.
If you want to change your text back to the original size, then you can also do that by clicking on the three-dotted menu next to the Typography settings.
This will open up a new dropdown menu where you have to click the ‘Reset’ option.
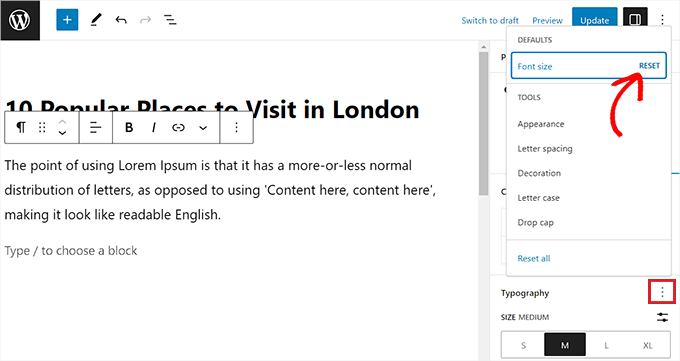

Other than that, you can also add drop caps, letter casing, spacing, appearance, and more using the same dropdown menu.
After that, just click the ‘Update’ or ‘Publish’ button to store your changes.
Keep in mind that these options aren’t available in the older classic editor for WordPress. If you want to use them, then think about making the switch.
Method 3: Change Font Size Using a Plugin
If you want to change font size using a plugin, then you can use this method.
First, you need to install and activate the Advanced Editor Tools plugin. For detailed instructions, see our beginner’s guide on how to install a WordPress plugin.
Upon activation, the plugin gives you more control over font sizes and text formatting, as well as a range of other features. It adds a new ‘Classic Paragraph’ block that has all the formatting features of your choice.
Upon activation, head to the Settings » Advanced Editor Tools page from the WordPress admin sidebar.
Once there, you can easily drag and drop formatting features from the ‘Unused Buttons’ section to the ‘Classic Paragraph’ block.
These features include font size, font family, copy, subscript, emoticons, source code, and more.
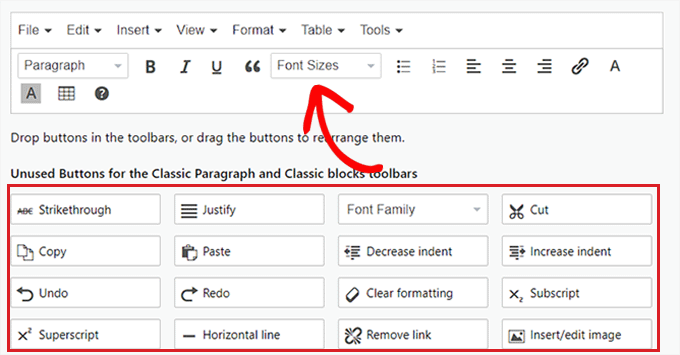

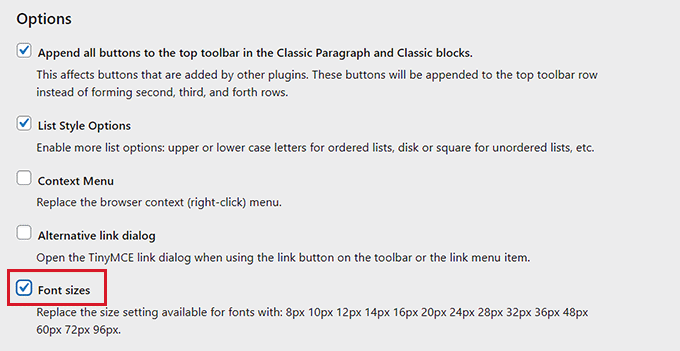
Once you have done that, scroll down to the ‘Options’ section and check the ‘Font Sizes’ option to access a larger number of font sizes.
After that, simply click the ‘Save Changes’ button to store your settings.

If you are using the plugin with the Classic editor, then you will have to switch to the ‘Classic Editor’ tab from the top of the page.
Once you are there, you need to take the same actions as in the block editor.


Make sure you click the ‘Save Changes’ button after making your changes.
Now, to see the plugin in action, you must open up a new or existing page/post from the WordPress dashboard.
Once you are there, click the ‘Add Block’ (+) button at the top left corner of the screen to open up the block menu.
From here, find and add the Classic Paragraph block to the page.


You can now use the ‘Font Sizes’ dropdown menu to change the size of the text in the ‘Classic Paragraph’ block.
Finally, click the ‘Update’ or ‘Publish’ to save your post or page settings.


Method 4: Change Site-Wide Font Size Using WPCode
If you want to change the font size across your entire website, then this method is for you.
You can easily add this functionality by inserting CSS code to your website using WPCode.
It is the best WordPress code snippet plugin on the market that makes it super easy and safe to add code to your website.
First, you need to install and activate the WPCode plugin. For detailed instructions, please see our step-by-step guide on how to install a WordPress plugin.
Note: WPCode has a free plan that you can use for the tutorial. However, upgrading to the pro version will give you access to more features like conditional logic, a cloud library of code snippets, and more.
Upon activation, head over to the Code Snippets » + Add Snippet page from the WordPress admin sidebar.
Once there, click the ‘Use Snippet’ button under the ‘Add Your Custom Code (New Snippet)’ option.


This will lead you to the ‘Create Custom Snippet’ page, where you can start by giving a title to your code snippet.
After that, select the ‘CSS Snippet’ option from the ‘Code Type’ dropdown menu on the right corner of the screen.
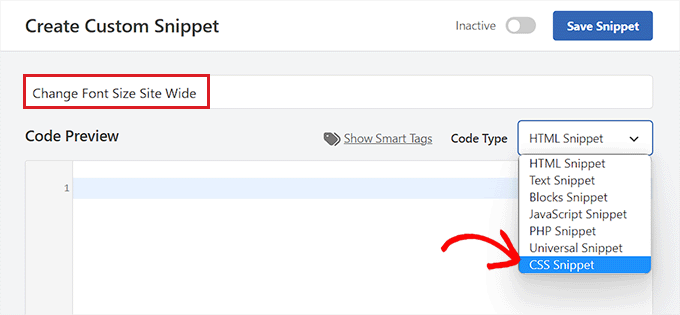

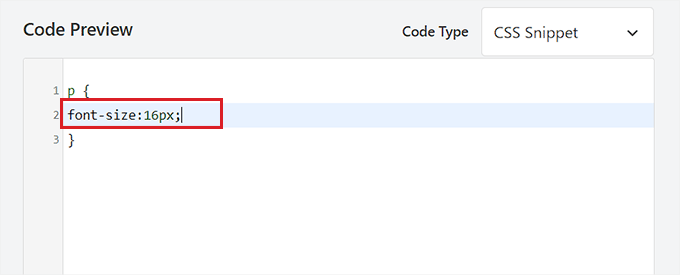
Next, copy and paste the following custom CSS code into the ‘Code Preview’ box:
p {
font-size:16px;
}
Once you have done that, simply add your desired text size next to the ‘font-size’ line in the CSS code.
It should look like this.

After that, scroll down to the ‘Insertion’ section and choose the ‘Auto Insert’ mode.
Your code will automatically be executed on your site upon activation.


Finally, scroll back to the top of the page and toggle the ‘Inactive’ switch to ‘Active’.
After that, click the ‘Save Snippet’ button to execute your code.


You have now successfully changed the font size on your WordPress site.
Bonus: Change Text Color in WordPress
Apart from size, you may also want to change the text color on your website to make your content more readable and visually appealing. It can also enhance your branding and help highlight important information.
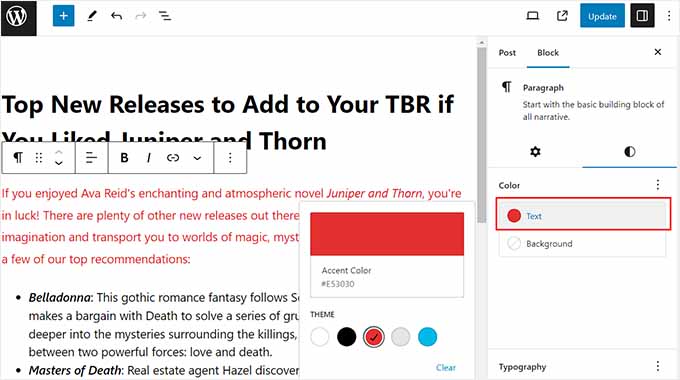
To change the text color, you must open a blog post in the block editor and choose a Paragraph block. Once you do that, switch to the ‘Styles’ tab from the block panel and click on the ‘Text’ option.
This will open the color picker tool from where you can select a text color of your choice for the content.

If you want to change the text colors all across the website, then you can use WPCode, which is the best WordPress code snippet plugin on the market.
Upon activation, simply visit the Code Snippets » + Add Snippet page from the WordPress admin sidebar and click ‘Use Snippet’ under the ‘Add Your Custom Code’ option.
This will take you to the ‘Create Custom Snippet’ page, where you must select ‘CSS Snippet’ as the code type and then copy and paste the following code into the ‘Code Preview’ box:
p { color:#990000; }
If you want to use a different color for your site’s headings, then you’ll need to use the h1, h2, h3, or similar selectors.


Finally, click the ‘Save Snippet’ button and toggle the ‘Inactive’ switch to ‘Active’.
You have now successfully changed the text color all over your website. For detailed instructions, see our tutorial on how to change the text color in WordPress.
We hope this article helped you learn how to easily change the font size in WordPress. You may also want to see our guide on how to use custom fonts in WordPress or our list of the best drag and drop WordPress page builder plugins.
If you liked this article, then please subscribe to our YouTube Channel for WordPress video tutorials. You can also find us on Twitter and Facebook.

