Hướng Dẫn A-Z, Kiến Thức Wordpress
What, Why, and How-To’s of Creating a Site-Specific WordPress Plugin
Do you want to add a site-specific plugin to your WordPress website?
A site-specific plugin allows you to easily add code snippets to your WordPress website without relying on your theme.
In this article, we will explain how to create a site-specific WordPress plugin and why it’s important.

What Is a Site-Specific WordPress Plugin?
A site-specific WordPress plugin is a standalone plugin that you can use to add all customization snippets that are not theme dependent.
When working on your website, you will often find WordPress tutorials asking you to add code to your theme’s functions.php file or a site-specific plugin.
WordPress doesn’t come with a site-specific plugin. You will need to create your own and then install and activate it.
Why Create a Site-Specific WordPress Plugin?
As we mentioned earlier, you will often come across tutorials showing some code that you can add to your theme’s functions.php file or a site-specific plugin.
These custom codes can be used to add new post types, taxonomies, shortcodes, and tons of hacks to improve your website.
If you add the custom code to your theme’s functions file, then it will disappear if you update or switch your theme.
You can create a child theme and use the child theme’s functions file to save your code. However, your code will still disappear if you switch themes.
A site-specific WordPress plugin allows you to easily add custom code snippets to your WordPress website and make sure they are theme-independent. It is a standalone WordPress plugin, which means it doesn’t depend on your theme, and you are free to update or switch your theme.
That being said, let’s take a look at how to easily add custom code using a site-specific plugin. We will show you two ways to do that, and you can choose the method that works best for you (hint: Method #2 is easier for beginners).
- Method 1: Manually Create a Site-Specific WordPress Plugin
- Method 2: Adding Custom Code Using WPCode (Recommended)
Method 1: Manually Create a Site-Specific WordPress Plugin
We know this may sound a bit geeky to beginners, but we will try to make it as simple as possible for you.
First, you need to create a new folder on your desktop and name it after your website. For example: mywebsite-plugin.

Now, open a plain text editor on your computer like Notepad or TextEdit.
You need to create a new file and save it as mywebsite-plugin.php in the plugin folder on your desktop.
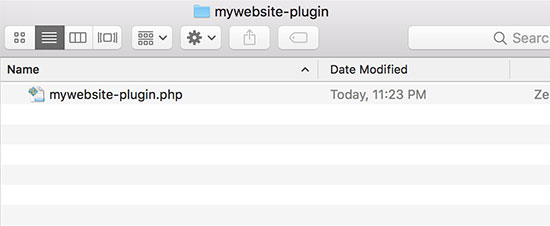
Your plugin file needs a specific header code so that WordPress can recognize it as a plugin. Go ahead and add the following code to your mywebsite-plugin.php file:
<?php
/*
Plugin Name: Site Plugin for example.com
Description: Site specific code changes for example.com
*/
/* Start Adding Functions Below this Line */

/* Stop Adding Functions Below this Line */
?>
You can replace example.com with your own domain name. Once you do that, your site-specific plugin is ready.
There are two ways to upload your site-specific plugin to your website. You can either upload it via your WordPress admin panel or use FTP.
1. Install Site-Specific Plugin From WordPress Admin Area (Recommended)
This method is easier and recommended for all users.
First, you need to create a zip file of your site-specific plugin folder.
Windows users can simply right-click on the plugin folder and select Send to » Compressed (zip) folder.
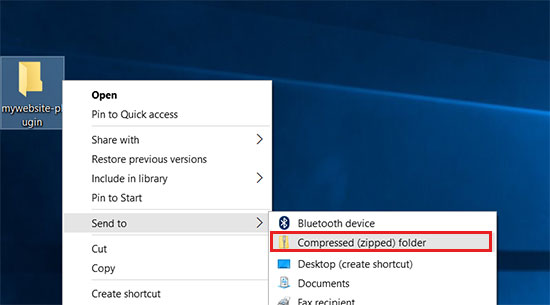
Mac users need to right-click.
Then, select “Compress mywebsite-plugin”.

Once you have the plugin’s zip file, go to the Plugins » Add New page in your WordPress admin area.
Then click on the ‘Upload Plugin’ button on the top.

Next, click on the ‘Choose File’ button to select the zip file you created earlier, and then click on the ‘Install Now’ button.
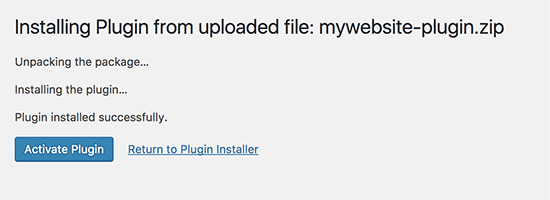
WordPress will now upload and install the plugin for you. Once it’s uploaded, you need to click on the ‘Activate Plugin’ button to start using your site-specific plugin.
2. Upload Your Site-Specific WordPress Plugin via FTP
For this method, you don’t need to create a zip file. You will be uploading the plugin via FTP.
First, you will need to connect to your website using an FTP client.
Once connected, go to /wp-content/plugins/ folder under the remote site column. Next, you need to select your site-specific plugin folder and upload it to your website.
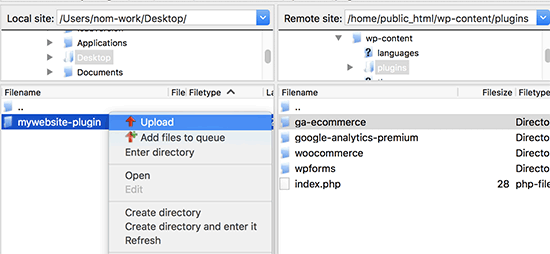
Your FTP client will now transfer your site-specific plugin folder to your WordPress website. This will install the plugin on your website.
However, you will still need to activate the plugin to start using it. You can do this by going to the ‘Plugins’ page inside your WordPress admin area and then clicking on the ‘Activate’ link below your site-specific plugin.

That’s all. Your site-specific plugin is now ready to be used.
Adding Custom Code Snippets to Your Site-Specific Plugin
There are two ways to edit your plugin and add custom code snippets to it.
The first method is to do it via the WordPress admin area. You can go to the Plugins » Editor page.
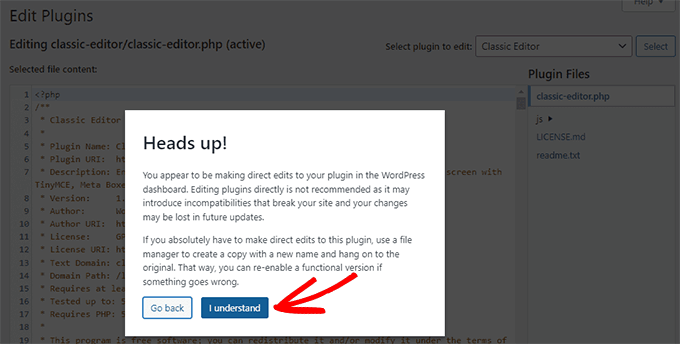
You will see a warning message, and you need to click on the ‘I understand’ button to continue. Alternatively, if you want a safer way to edit the files, then skip to the second method below.
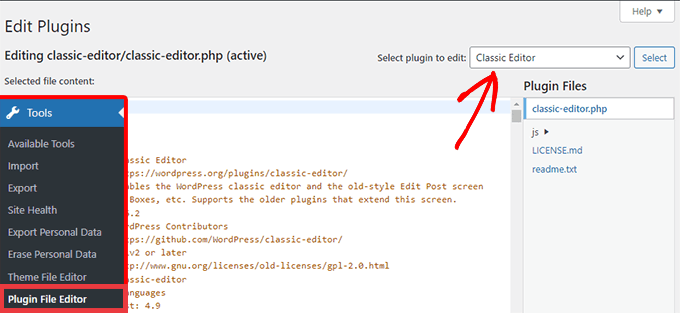
Next, you need to select your site-specific plugin from the drop-down menu labeled ‘Select plugin to edit.’
The editor will load your plugin file, and you will be able to add code snippets to it.
Once you are done, click the ‘Update File’ button to save your changes.
If there is something missing in your code or it has the potential to break your website, then the plugin editor will automatically undo your changes.
However, if the editor fails, and you see the white screen of death, then you can use FTP to edit your plugin file and undo those changes.
The second method is to directly edit the plugin file using FTP. Simply go to the plugin folder using your FTP client. Right-click on the plugin file and then select ‘View/Edit’.

You can also download the plugin file to your computer, edit it, and then upload it back.
Method 2: Adding Custom Code Using WPCode (Recommended)
This method is a lot simpler and gives you a better way to manage your individual code snippets in WordPress using WPCode.
The first thing you need to do is install and activate the free WPCode plugin on your website. For more details, see our step-by-step guide on how to install a WordPress plugin.
Upon activation, the plugin will add a new menu item labeled ‘Code Snippets’ to your WordPress admin menu. Clicking on it will bring you to a page where you can manage all your custom codes.
To add your first code snippet, click the ‘Add New’ button.

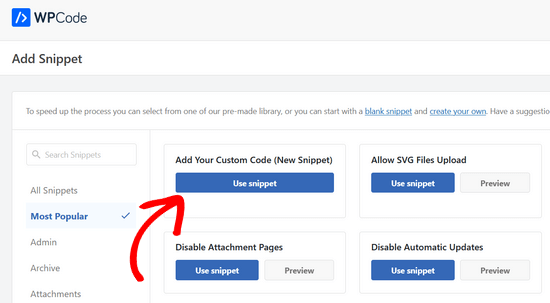
This will bring you to the ‘Add Snippet’ page. Here, you can choose a code snippet from the pre-made library or add your custom code.
To add custom code, navigate to the ‘Add Your Custom Code (New Snippet)’ option and click the ‘Use snippet’ button.
Now, you can enter a title for your custom code snippet. This could be anything that helps you identify the code.
After that, you can go ahead and paste your code snippet into the code box. You also need to select the ‘PHP Snippet’ type from the ‘Code Type’ dropdown list on the right.

You can also add notes for the code in the ‘Basic info’ section.
You should use this area to write down what this code does, where you found it, and why you are adding it to your website. This will help the “future you” remember why the “past you” added this code.
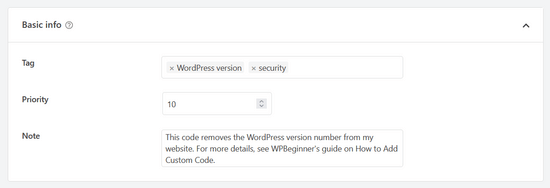
You also have the option to assign tags to your code snippets, which can help organize code snippets by topic and functionality.
The plugin also allows you to select how you want to run the code snippet. In the ‘Insertion’ section, you can select the ‘Auto Insert’ method to automatically insert and execute the code on your site.
You can choose from the admin area, front-end, or everywhere options. If you are unsure, then keep the default ‘Run Everywhere’ option.

Or, you can choose the ‘Shortcode’ method. With this method, the snippet is not automatically inserted. Once you save the snippet, you will get a shortcode that you can manually insert anywhere on your site.
You can also use the ‘Smart Conditional Logic’ section to either show or hide auto-inserted snippets based on a set of rules.

For example, you can load code snippets for logged-in users only, load PHP code snippets only on specific page URLs, show code snippets based on the type of page, and more.
Finally, you can toggle the switch from ‘Inactive’ to ‘Active’ and then click on the ‘Save Snippet’ button.
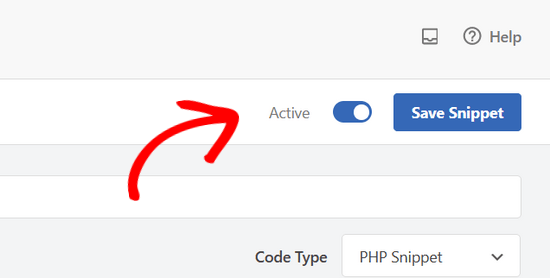
If you want to save the code snippet without activating it, then you can click on the ‘Save Snippet’ button only.
Once you have saved and activated a code snippet, it will become automatically effective on your website if that’s the insertion method you chose.
For more details, see our guide on how to easily add custom code snippets in WordPress.
We hope this article helped you learn why and how to create a site-specific WordPress plugin. You may also want to see our list of useful functions file tips and the most wanted WordPress hacks to best use your site-specific plugin.
If you liked this article, then please subscribe to our YouTube Channel for WordPress video tutorials. You can also find us on Twitter and Facebook.

