Hướng Dẫn A-Z, Kiến Thức Wordpress
How to Install and Setup WP Super Cache for Beginners (Easy Way)
A fast WordPress website makes your visitors happy and helps your site rank better. That’s because search engines like Google now consider site speed to be an important ranking factor.
WP Super Cache is a popular plugin that creates static HTML files of your web pages. This means your server doesn’t have to work as hard, making your site load faster for visitors.
As web performance experts, we’ve seen how tools like WP Super Cache can significantly speed up websites, boost SEO, and improve the user experience for website visitors.
In this article, we’ll guide you through installing and setting up WP Super Cache on your WordPress site. We’ll explain each step clearly, so even if you’re not tech-savvy, you can follow along. By the end, you’ll have a faster website that visitors and search engines will appreciate.

What Is WP Super Cache and Why You Should Use It?
WP Super Cache is one of the most popular and best WordPress caching plugins. It’s a free tool and has over a million active installs.
WP Super Cache makes a cache copy of each page on your site in the form of a static HTML file. This way, whenever someone visits your site, they’re served the copied version quickly instead of generating the entire website from scratch.
As a result, your WordPress site’s speed and performance improve dramatically. The cache plugin skips a lot of steps behind the scenes to ensure that your visitors don’t have to wait for the page to open.
This will improve the experience of your website visitors. A site that loads quickly encourages people to visit it more often, leading to more engagement and conversions as users spend more time on your posts and pages.
Besides that, with a fast-loading website, you can also see a boost in your WordPress SEO and search engine rankings. That’s because Google gives a significant advantage to faster websites, as it uses website speed as a ranking factor.
Now, are you ready to set up WP Super Cache on your website? Let’s get to it!
Setting Up WP Super Cache – the Easy Way
The first thing you need to do is install and activate the WP Super Cache plugin on your website. For more details, you can follow our guide on how to install a WordPress plugin.
Upon activation, WP Super Cache will notify you that caching is not enabled on your website at the moment.
To enable cache, go to Settings » WP Super Cache. Then, under the ‘Easy’ tab, go ahead and click on the ‘Caching On’ option. Once you’ve done that, click the ‘Update Status’ button.

After turning on the cache, you’ll need to scroll down to the ‘Cache Tester’ section.
Once there, you should click on the ‘Test Cache’ button to check if it is working.
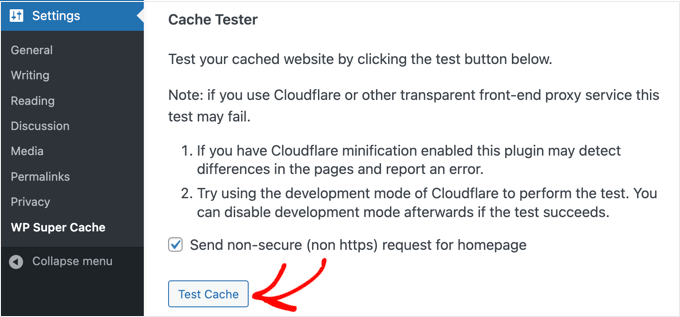
WP Super Cache will fetch your WordPress site twice and compare the timestamps of both pages. If both timestamps match, that means caching is working on your site now.
WP Super Cache Advanced Setup
WP Super Cache is a powerful WordPress plugin that comes with tons of advanced options. These options can further improve your site’s performance and give you more control over how the plugin will cache your site.
Enable Caching
To set up WP Super Cache with advanced options, go to the ‘Advanced’ tab in the WP Super Cache plugin settings. Next, click the checkbox for ‘Enable Caching.’

Below caching, you’ll see options for the ‘Cache Delivery Method.’ We recommend using the ‘Simple’ option if you’re a beginner and unfamiliar with editing your server files.
After you’ve chosen your caching option, make sure to click the ‘Update Status’ button.
Enable Compression in WP Super Cache
Compression allows WP Super Cache to serve cached files as compressed files, which improves load time. These files are smaller and can be downloaded by browsers more quickly.
To enable compression, scroll down to the ‘Miscellaneous’ section in the ‘Advanced’ settings tab and check the box that says ‘Compress pages so they’re served more quickly to visitors.’

Once again, click on the ‘Update Status’ button to save your changes.
Enable Dynamic Caching
If you want to keep certain parts of a webpage dynamic during caching, then WP Super Cache offers an option for it.
Enabling dynamic caching is useful in certain situations, especially if you have pages that contain frequently changing content. For example, you can speed up pages that contain ads by allowing dynamic caching.
To enable this option, you can head over to the ‘Advanced’ section and click the checkbox for ‘Enable dynamic caching.’

Make sure to save your changes when you’re finished.
Set Up Expiry Time & Garbage Collection
WP Super Cache also lets you set up the expiry time and frequency for deleting cached pages from your server.
To start, simply scroll down to the ‘Expiry Time & Garbage Collection’ section under the ‘Advanced’ tab to configure it.

The ‘Cache Timeout’ tells the plugin to remove the cached page and perform a fresh cache. The plugin will set it to 1800 seconds by default, which is great for a high-traffic website.
However, if you have a new website that doesn’t get a lot of traffic, then 3600 seconds is a good starting point.
Other than that, you can schedule a time for the plugin to check for stale cached files and remove them.
When you’re finished making your selections, you’ll need to click on the ‘Change Expiration’ button to save your changes.
Specify Pages You Don’t Want to be Cached
By default, the plugin will cache all the pages on your site. This can increase the size of your cache files and use more resources. However, WP Super Cache allows you to choose pages that you don’t want to be cached.
You can scroll down to the ‘Rejected URL Strings’ section in the ‘Advanced’ tab to use this feature. In the text box, go ahead and enter the URL string of the pages that you don’t want the plugin to cache.
For example, if you have an eCommerce store, then you can exclude pages that visitors don’t often visit and save server resources. These can be the checkout page, account page, and thank you page.
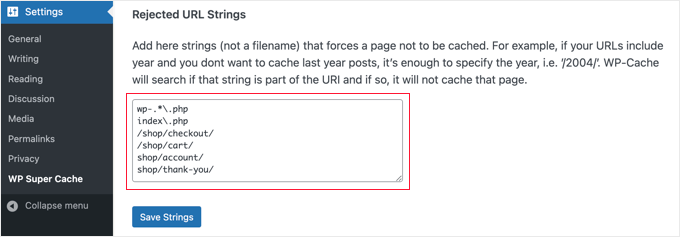
When you’re done, don’t forget to click the ‘Save Strings’ button.
Setting Up WP Super Cache to Work With Your CDN
If you are also using a Content Delivery Network (CDN) service to speed up your website, then you can configure WP Super Cache to work with it. Otherwise, you can safely skip this section.
A CDN is a network of servers distributed across different geographic locations, which helps quickly deliver content to your visitors. For more details, take a look at our infographic on why you need a CDN.
Tip: We recommend using Cloudflare because it is a free CDN provider that’s easy to set up. See our tutorial on how to set up Cloudflare’s free CDN on your WordPress site.
To set up WP Super Cache to work with your CDN, go ahead and click on the CDN tab in your settings. Then, check the box next to the ‘Enable CDN Support’ option.
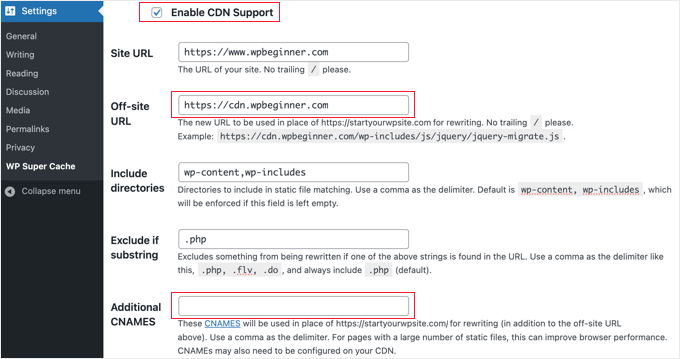
Next, you need to enter your ‘Off-site URL’. This is your CDN’s ‘pull zone’, which is the URL where your files are stored on the CDN.
The setting here depends on your CDN service, but here are some tips:
- If you are using Cloudflare, then you should leave this field blank. WP Super Cache will automatically detect and work with Cloudflare.
- If you are using a different CDN service, then you should enter something like:
https://cdn.wpbeginner.com. Make sure you replace ‘wpbeginner.com’ with your website’s domain name. - If in doubt, you can log in to your CDN service and check your account dashboard setting for ‘domain’, ‘CDN domain’ or ‘CDN URL’.
If you know that your CDN has multiple URLs, then you can enter them in the ‘Additional CNAMES’ field like: http://cdn1.wpbeginner.com, http://cdn2.wpbeginner.com, http://cdn3.wpbeginner.com. Otherwise, you should leave this field blank.
You can leave the other settings to default. Lastly, check the box that says ‘Skip https URLs to avoid “mixed content” errors’ and then click the ‘Save Changes’ button.
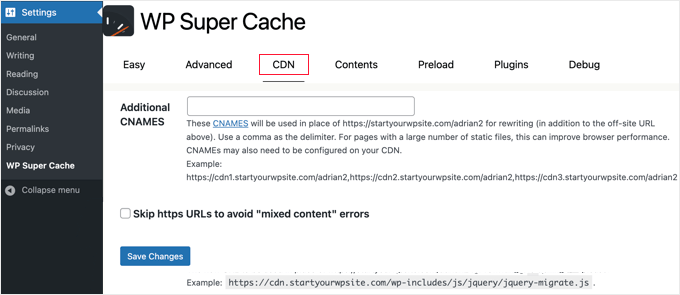
Now, your website is ready to serve static content from a CDN.
Serve a Static Site With WP Super Cache
The preload mode in WP Super Cache allows you to create super cache static files for all your posts and pages and serve a static website. This way, your content will load quickly whenever someone visits your site.
A super cache static file helps conserve server resources, serve an old site that is not being updated anymore, and improve site speed by serving static content only.
To start, head over to the ‘Preload’ tab in the WP Super Cache plugin. Next, you can set the time for refreshing the preloaded cache files.
By default, the plugin will set it to 600 minutes, but you can decrease the time if you publish multiple articles every day.
Remember that pre-loading your entire WordPress site takes some time and consumes a lot of your server’s resources. You can leave it to 0 if you don’t want your static files to expire ever, unless you manually refresh the cache.
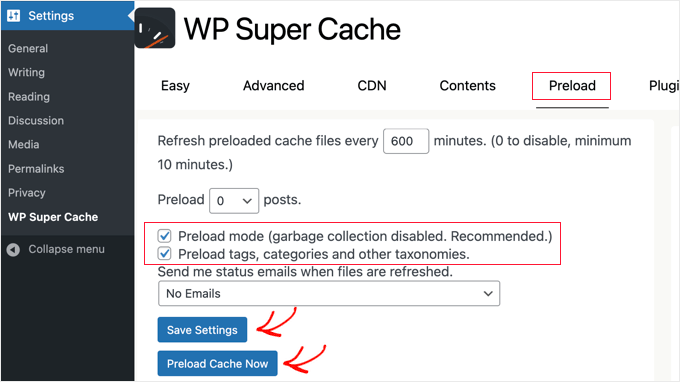
After that, make sure to check the boxes for ‘Preload mode (garbage collection disabled. Recommended).’ You can also enable preloads for different tags, categories, and other taxonomies on your website.
The plugin also offers an option to get email alerts whenever your files are refreshed. By default, it will use the ‘No Email’ setting, but you can change it by choosing an option from the dropdown menu.
When you’re done, go ahead and save your settings and then click the ‘Preload Cache Now’ button.
Expert Guides on WordPress Caching
We hope this guide helped you set up WP Super Cache on your WordPress blog. You may like to see some other articles related to WordPress caching:
- How to Easily Fix Leverage Browser Caching Warning in WordPress
- How to Clear Your Cache in WordPress (Step by Step)
- Best WordPress Caching Plugins to Speed Up Your Website
- LiteSpeed Cache vs. WP Rocket – Which One is Better?
- How to Properly Install and Setup WP Rocket in WordPress
- How to Install and Setup W3 Total Cache for Beginners
- The Ultimate Guide to Boost WordPress Speed & Performance
- How to Speed up WooCommerce Performance
If you liked this article, then please subscribe to our YouTube Channel for WordPress video tutorials. You can also find us on Twitter and Facebook.

