Hướng Dẫn A-Z, Kiến Thức Wordpress
How to Manually Update WordPress Plugins via FTP
Automatic WordPress plugin updates sometimes fail, potentially breaking your website. When this happens, manually updating via FTP is often the only solution.
Many WordPress users panic when faced with this situation, fearing they’ll make a mistake and further damage their site. But manual updates aren’t as daunting as they seem. We’ve had plenty of experience in this and we’ll walk you through the steps.
In this guide, we will show you how to manually update WordPress plugins, from connecting to your site via FTP to activating the updated plugin.
When to Update WordPress Plugins Manually
There are several reasons why you might want to manually update WordPress plugins via FTP.
Sometimes, automatic plugin updates may not work properly due to conflicts with themes, other plugins, or server configurations.
They may also fail due to incorrect file permissions. In such cases, manual updates can resolve these issues.
If your server is overloaded, automatic updates might fail. You may even see the briefly unavailable for scheduled maintenance error, syntax error, or internal server error. Manual updates can ensure your plugin is up-to-date without adding additional server load.
With manual updates, you also have control over which version of the plugin you want to install. This can be useful if a new version introduces features or changes that you don’t want to implement immediately.
Finally, if you manage multiple WordPress sites, it’s easier to perform manual updates on one centralized location rather than logging in and out of each site and doing the updates there individually.
With that in mind, let’s take a look at how to manually update WordPress plugins via FTP.
- Step 1: Download the Latest Plugin Version
- Step 2: Connect to Your Website via FTP
- Step 3: Locate and Remove the Existing Plugin
- Step 4: Upload and Activate the New Plugin Version
Step 1: Download the Latest Plugin Version
First, you will need to download the latest version of the plugin you are trying to update. If it is a free plugin, then you can download it from the WordPress.org plugin page.

If it is a premium plugin, then you can download the latest version from the specific plugin’s website. You need to log in to your account and download the plugin to your computer.
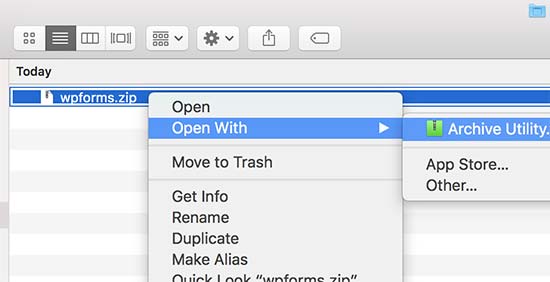
All plugins come in .zip files, so you need to extract them.
Step 2: Connect to Your Website via FTP
Next, you’ll need an FTP client installed on your computer. We will be using FileZilla in our example, but you can use any FTP client you like.
To connect to your website using FTP, you will need to enter your website name in the hostname with your FTP username and password.

If you don’t know your FTP username or password, then check the email your WordPress hosting company sent you when you signed up. It usually contains your FTP username and password.
Alternatively, you can also find this information in the cPanel or in the hosting dashboard of your hosting account.
If your website is hosted on Bluehost, you can log in to your dashboard and navigate to the ‘Hosting’ tab. After that, scroll down to the Server Information section and click ‘Manage’ next to FTP Access.

You will then arrive at the FTP Accounts page of your cPanel. There should be a list of FTP accounts that you can use to connect your hosting with an FTP client.
If you forgot your password, you can simply click ‘Change Password’ under Actions to set a new password. Then, click the ‘Change Password’ button.

After that, you can enter your new password in the FTP client.
Once you are connected to your website via FTP, you need to go to the /wp-content/plugins/ folder and move on to the next step.
Step 3: Locate and Remove the Existing Plugin
At this stage, you’ll see different folders for all the plugins you have installed on your WordPress site. Right-click on the plugin that you want to update and then select ‘Rename’

Now rename this plugin by simply adding -old to the plugin folder name. For example, wpforms-old.
Next, you must download the renamed folder to your computer as a backup. This will allow you to revert to the old version in case you need it.
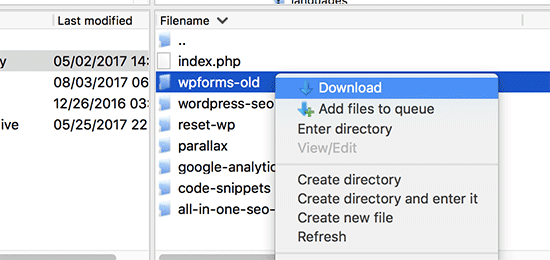
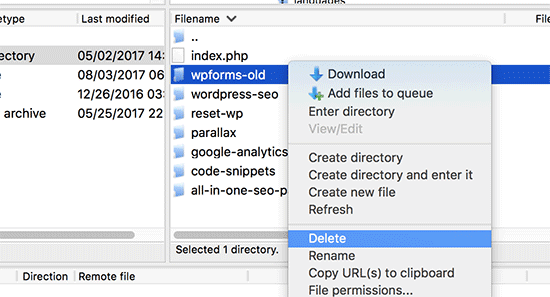
After downloading the old plugin to your computer, you can delete it from your website.
Doing this will remove any trace of the plugin from your WordPress.
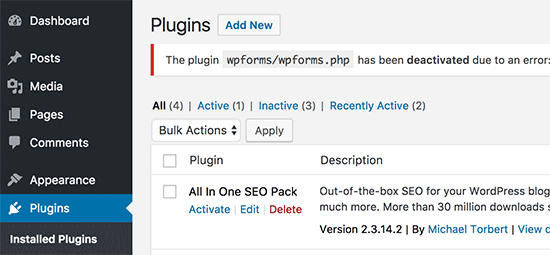
We also want to make sure that the plugin is deactivated in the WordPress database as well. To do that, you need to simply log in to your WordPress admin area and visit the Plugins page.
You will see an error that the plugin has been deactivated due to an error.
Step 4: Upload and Activate the New Plugin Version
Now that we have removed the old version, it is time to install the latest version of the plugin.
Switch to your FTP client and under the ‘Local’ section, locate the new plugin folder on your computer. Now right-click and select ‘Upload’ from the FTP menu.
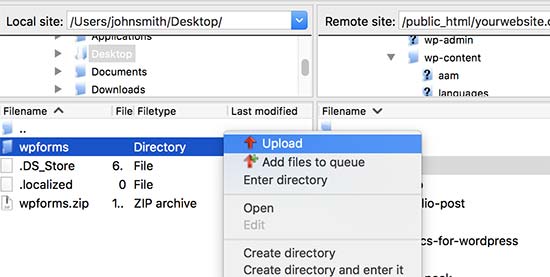
Your FTP client will start transferring the plugin folder from your computer to your website.
Once finished, you can log in to your WordPress admin area and go to the Plugins page. You need to find the newly installed plugin and activate it.

You can now check the updated version of the plugin to make sure that everything is working correctly.
That’s all, you have successfully updated a WordPress plugin via FTP.
Should You Use an Outdated WordPress Plugin?
It is crucial for WordPress security to always use the latest version of WordPress. It is also equally important to keep your WordPress plugins and theme updated.
If a WordPress plugin stops working after the update, then you can rollback the plugin and report the issue to the plugin developer.
That said, if you see a WordPress plugin that has not been tested with the latest versions of WordPress, it doesn’t mean it doesn’t work.
It simply means the developer hasn’t recently tested the plugin or updated the readme file. In WPBeginner, we sometimes come across and recommend plugins that haven’t been tested but still work great for their purpose.
If you’re not sure whether a plugin is safe to use, you can always install it on the local version of your WordPress site. This way, any errors caused by the plugin won’t affect the live version of your site.
We hope this article helped you learn how to manually update WordPress plugins via FTP. You may also want to see our beginner’s guide to WordPress database management and our tutorial on how to add an FTP-like file manager in WordPress.
If you liked this article, then please subscribe to our YouTube Channel for WordPress video tutorials. You can also find us on Twitter and Facebook.

