Hướng Dẫn A-Z, Kiến Thức Wordpress
What, Why, and Hows of WordPress Security Keys
What, Why, and Hows of WordPress Security Keys
In our experience, WordPress security is one of the most important things to think about when running a website. And WordPress security keys are an essential part of this.
WordPress uses security keys to protect your website against hacking attempts. You can use them more efficiently to improve WordPress security.
In this article, we will discuss what are WordPress security keys and salts and why you should use them.


What Are WordPress Security Keys and SALTs?
WordPress security keys are an encryption tool that protects login information by making it harder to decode.
These keys act just like real keys and are used to lock and unlock encrypted information such as passwords, keeping your WordPress site secure.


Here is how it works.
Basically, when you log in to a WordPress website, your information is stored on your computer’s cookies. This allows you to continue working on your website without the need to log in each time a page loads.
All information is stored in encrypted form by converting it into a string of alphanumeric and special characters. This encrypted data can be translated using WordPress security keys. Without the keys, this data is nearly impossible to crack.
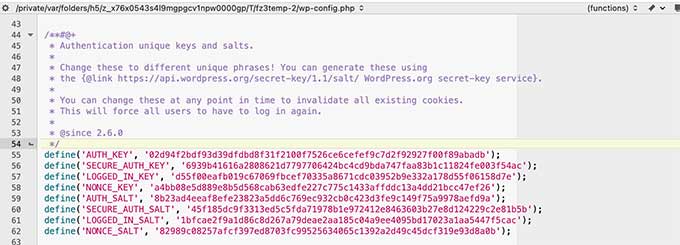
Your WordPress site automatically generates these security keys and stores them in your WordPress configuration file (wp-config.php).
There are a total of four security keys:
- AUTH_KEY
- SECURE_AUTH_KEY
- LOGGED_IN_KEY
- NONCE_KEY
Apart from WordPress security keys, you’ll also find the following SALTs.
- AUTH_SALT
- SECURE_AUTH_SALT
- LOGGED_IN_SALT
- NONCE_SALT
Salts add extra information to your encrypted info, which provides another layer of security for your encrypted data.
Why Use WordPress Security Keys?
WordPress security keys protect your website against hacking attempts by making your passwords secure.
For instance, a regular password with medium-level difficulty can be easily cracked using brute force attacks.
On the other hand, a password string like ‘7C17bd5b44d6c9c37c01468b20d89c35e576914c289f98685941accddf67bf32b49’ takes years to decrypt without knowing the security keys.
That’s why you should never share WordPress security keys with anyone and protect them as you normally protect sensitive information online.
With that in mind, let’s take a look at how to use WordPress security keys to keep your WordPress site protected.
How to Use WordPress Security Keys?
Generally, you don’t need to do anything extra since, in most cases, WordPress will automatically generate and use security keys + salts on each new WordPress install.
You can view your WordPress security keys and salts by using an FTP client or the File Manager app in your WordPress hosting account control panel.
Simply connect to your website and open the wp-config.php file. Inside it, you’ll see your WordPress security keys defined.


However, depending on how you initially installed WordPress, your website may not have security keys defined at all.
If your security keys are empty, then don’t worry. You can easily add them manually by going to the WordPress Security Key Generator page to generate a new set of keys.


Next, copy and paste these keys inside your wp-config.php file, and you are done.
You can use the same method to delete your current WordPress security keys and replace them with new keys.
Note: When you replace the security keys, all users will be forced to re-login, which is great for security.
Regenerate WordPress Security Keys Using a Plugin
If you suspect that your website is hacked, then you need to regenerate WordPress security keys and change your passwords.
You can manually copy and paste new security keys, as mentioned above. However, you can also a plugin. This way you can set a schedule to automatically regenerate security keys regularly, too.
Expert tip: Do you think your website has been hacked? Restore your peace of mind with our expert hacked site repair service. Trust our experienced team to handle the technical complexities to get your site up and running again.
1. Update WordPress Security Keys using Sucuri
The easiest way to automatically regenerate WordPress security keys is by using Sucuri. It is one of the best WordPress security plugins on the market that protects your WordPress website against common threats.
To get started, the first thing you’ll need to do is install and activate the Sucuri Security plugin. For more details, see our step-by-step guide on how to install a WordPress plugin.
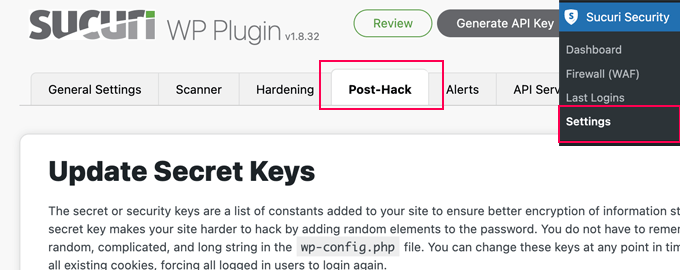
Upon activation, you’ll want to visit the Sucuri Security » Settings page and switch to the ‘Post-Hack’ tab.


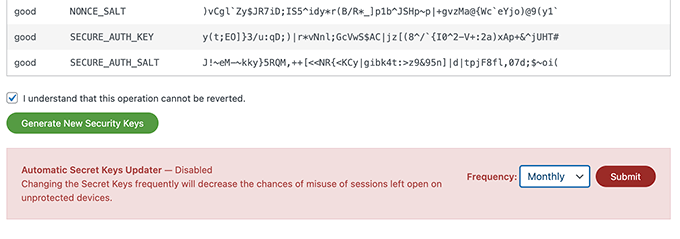
From here, simply click on the ‘Generate New Security Keys’ button under the ‘Update Secret Keys’ section.
Note: Regenerating new security keys will log you out of the WordPress admin area, and you’ll need to log in again.


After that, revisit the Sucuri Security » Settings page and switch to the ‘Post-Hack’ tab again.
Under the security keys section, enable the ‘Automatic Secret Keys Updater’ by choosing a frequency (daily, weekly, monthly, yearly). Then, go ahead and click on the ‘Submit’ button.


Sucuri will now automatically reset your WordPress security keys based on your chosen frequency.
2. Update WordPress Security Keys using Salt Shaker
This method is for users who are not using Sucuri and need to automate security key regeneration.
First, you need to install and activate the Salt Shaker plugin. For more details, see our step-by-step guide on how to install a WordPress plugin.
Upon activation, you’ll need to visit the Tools » Salt Shaker page to configure plugin settings.


From here, you can set a schedule to generate security keys automatically. You can also just click on the ‘Change now’ button to regenerate security keys immediately.
We hope this article helped you understand WordPress security keys and how to use them. You may also want to see our guide on how to fix the secure connection error in WordPress or our expert pick of the best WordPress firewall plugins.
If you liked this article, then please subscribe to our YouTube Channel for WordPress video tutorials. You can also find us on Twitter and Facebook.

